ကဲ... Online ICT Reader
ပရိသတ္ႀကီးေရ....အခုတစ္ခါေဖာ္ျပေပးမွာကေတာ့ RADIUS Server ရဲ႕Installation ျပဳလုပ္ပံုအေၾကာင္းပဲ
ျဖစ္ပါတယ္။ Radius Server အေၾကာင္းကိုေတာ့ သိၿပီးျဖစ္မွာပါ။ဘာျဖစ္လို႔လဲဆိုရင္ Radius Server
အေၾကာင္းသိေကာင္းစရာဆိုတဲ့နာမည္နဲ႔ ေ႐ွ႕အပတ္က
တင္ဆက္ၿပီးလို႔ပါပဲ။ ဒါေၾကာင့္
အခုတစ္ခါမွာေတာ့ Radius Server အေၾကာင္းကို အက်ယ္တ၀င့္
ေျပာမျပေတာ့ပါဘူးေနာ္။
ဒါဆိုလို႔႐ွိရင္ Radius Server ကို
Install လုပ္ပံုေလးကို စလုိက္ၾကရေအာင္လား။ Radius Server က ADနဲ႔တြဲၿပီးမွ
အလုပ္လုပ္တာဆိုေတာ့ AD ကိုေတာ့ အရင္တင္ထားၿပီးသား။ Radius Server ကို Microsoft OSေတြမွာက်ေတာ့
Internet ျဖစ္ရမယ္။ Authentication Service လို႔ ေခၚၾကပါတယ္။ ဒါေၾကာင့္ ၎ Internet
Authentication Service ကို Run ေပးရမွာပါ။ ထံုးစံအတိုင္း Service ေတြ Run
ေတာ့မယ္ဆိုရင္ေတာ့
Start>All Programs>Control
Panel>Add or Remove Programs ကို သြားရပါလိမ့္မယ္။



Add
or Remove Programs Box က်လာတဲ့အခါ Add/Remove Windows Components ဆိုတာကိုႏွိပ္လိုက္။
၎ေနာက္ Please Wait ဆိုၿပီး ေခတၱေစာင့္ခိုင္းပါလိမ့္မယ္။
Windows Component Box က်လာၿပီေနာ္။
၎ထဲကမွ Networking Service ကို Selective မွတ္ၿပီးDetail ကိုသြားလိုက္ပါ။

Networking
Service ေတြထဲကမွ Internet Authentication Service ကို ေ႐ြးၿပီး ၎ေဘးက Check Box
ေလးကို "On" ေပးရမွာပါ။ "On" ေပးၿပီးရင္ OK ကိုႏွိပ္ပါ။

Networking
Service ပါ "On" ၿပီးသားေတြ႔ပါလိမ့္မယ္။

အခုဆိုရင္
ကၽြန္ေတာ္တို႔ "On" ေပးလိုက္တဲ့ Internet Authentication Service ကို
Run ေနပါၿပီ။

ကဲ... Finish Box က်လာၿပီဆိုေတာ့
Service Run လို႔ေတာ့ၿပီးသြားၿပီေပါ့။ Finish Button ကို
ႏွိပ္လိုက္ေနာ္။

အခုဆိုရင္ Radius Server ေခၚ Internet
Authentication Service ကို သြားလို႔ရၿပီေပါ့။ ေအာက္မွာ
ျပထားတဲ့အတိုင္း သြားလိုက္ပါ။

Internet
Authentication Service ထဲကို ေရာက္ၿပီဆိုရင္ေတာ့ ၎ကို AD (Active Directory)
ထဲကို Register လုပ္ရမွာျဖစ္ပါတယ္။ ဒါေၾကာင့္ Internet Authentication Service
ဆိုတဲ့အေပၚမွာ Right Click ႏွိပ္ၿပီး Register Server in Active Directory
ဆိုတာကို ႏွိပ္ေပးပါ။
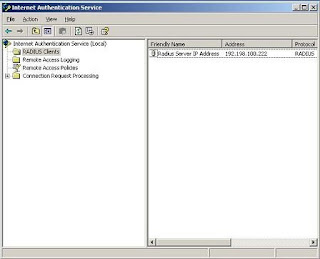
Radius Server နဲ႔ပတ္သက္ၿပီး Server
ကို Register လုပ္ၿပီးသြားရင္ ဒီ Radius Server ကို လွမ္း၀င္
အသံုးျပဳမယ့္ Radius Client ေတြအတြက္
Radius Client အသစ္ေတြကို ဖန္တီးေပးရမွာပါ။ အဲဒီလို
ဖန္တီးေပးဖုိ႔အတြက္ Internet
Authentication Service ေအာက္က Radius Client ေပၚကို Right Click ႏွိပ္ၿပီး New
Radius Client လို႔ေျပာပါ။

New Radius Client Box
က်လာတဲ့အခါမွာေတာ့ Friendly Name ေနရာမွာ မိမိ Radius Client နဲ႔
ပတ္သက္တဲ့အမည္ကို ထည့္ေပးရမွာပါ။ ၎
Client Address မွာ ၎ Client ရဲ႕ IP Address ကို
ထည့္ေပးပါ။

အခုမိမိထည့္လိုက္တဲ့ Client ႐ွိ၊
မ႐ွိကို Verify လုပ္လို႔ရပါတယ္။

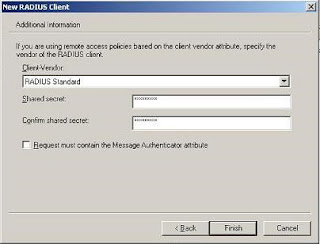
ကဲ...ေအာက္မွာေပၚလာတဲ့ Box ထဲမွာ
Client Vendor မွာ Radius Standard လို႔ ေ႐ြးေပးၿပီး Shared Secret ကို ထည့္ေပးပါ။
Password လုိသေဘာပါ။

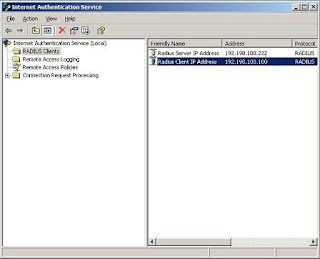
Radius Client တစ္ခုတည္ေဆာက္လိုက္ပါ။

ေနာက္ထပ္
Radius Client ေတြကုိလည္း အထက္ကလိုပဲ ျပဳလုပ္ရမွာပါ။

ကဲ........ေနာက္ထပ္ Remote Access
Policy ေတြကို သတ္မွတ္ၾကရေအာင္ဗ်ာ။ ဘာမွမခက္ပါဘူး။
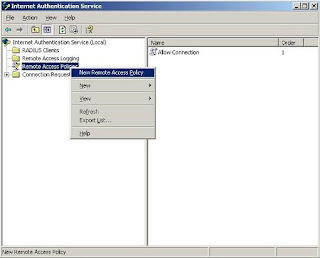
Remote Access Policies ကို Right
Click ႏွိပ္ၿပီး New Remote Access Policy ကို ႏွိပ္လိုက္႐ံုပါပဲ။

Welcome Page က်လာတဲ့အခါ Next
ကိုႏွိပ္၊ ေ႐ွ႕ဆက္သြားပါ။ ၄င္းေနာက္ Policy Configuration
Method box က်လာတဲ႔အခါမွာ Policy Name
ေနရာမွာ မိမိ Access လုပ္မယ္႔ Policy name ကိုေပးပါ။
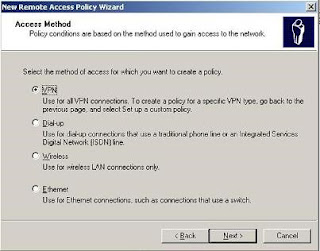
Access
Method မွာလည္းပဲ မိမိအသံုးျပဳမယ္႔ Access Method ကိုေရြးေပးပါ။

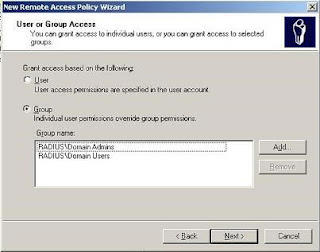
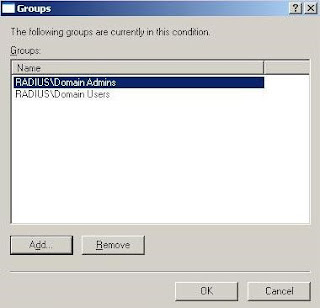
User or Group access page မွာေတာ႔
Radius server ဆီကို Access လုပ္ခြင္႔ေပးမယ္႔ user and
group ေတြကိုထည္႔ေပးပါ။

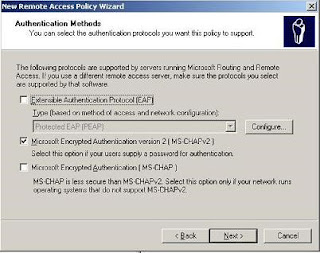
Authentication Method box မွာေတာ႔
ကိုယ္အသံုးျပဳမယ္႔ Authentication ကိုေရြးေပးပါ။

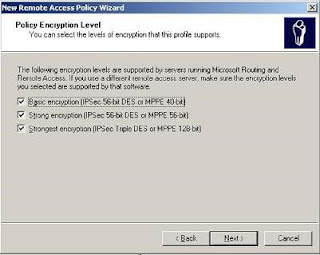
Policy Encryption Level မွာလည္းပဲ
ယခု Policy ကို Support လုပ္မယ္႔ဟာေတြကို Select မွတ္ပါ။

ျပီးသြားျပီဆုိရင္ေတာ႔
Finish ကိုႏွိပ္လိုက္ပါ။
Remote Access Policy
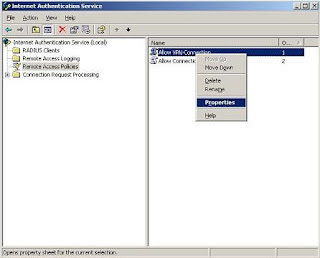
သတ္မွတ္ျပီးလို႔ရွိရင္ ၄င္းကို configure လုပ္ၾကရေအာင္ပါ။ Allow VPN
Connection ေပၚကို Right Click
ႏွိပ္ျပီး properties ကိုႏွိပ္ပါ။

၄င္းေနာက္ မိမိ VPN ကို Access
လုပ္ခြင္႔ျပဳမယ္႔ User ေတြကို ထည္႔ေပးပါ။

ျပီးရင္ OK ေျပာေပးပါ….ကဲ တစ္ဆင့္ျခင္းေဖာ္ျပေပးျပီးပါျပီး
အားလံုးအစဥ္ေျပပါေစလို႔ေမွ်ာ္လင့္ပါတယ္
ခင္ဗ်ာ………….




No comments:
Post a Comment