ကဲအခု DDNS လို႔ေခၚတဲ့ Dynamic Domain
Name System ကို Step by Step Install လုပ္ပံုလုပ္နည္းေလး ေဖာ္ျပေပးလုိက္ပါတယ္။ DNS
ကို Install လုပ္ရန္အတြက္ Start>Control panel>Add Remove Programsထဲကို
သြားပါ။

ဒါဆိုရင္ Add or Remove Program
ပြင့္လာပါမယ္။ Add / Remove Windows Components ထဲကို
၀င္ပါ။Windows Components Wizard Box
ေပၚလာပါလိမ့္မယ္။

အဲဒီ Windows Components Wizard ထဲက Networking Serviceကို Select မွတ္ Detail Button ကို ႏွိပ္ပါ။၄င္း Detail Button ကို ႏွိပ္လုိက္ရင္ Networking Service Components ေတြေပၚလာပါလိမ့္မယ္။ အဲဒီထဲကDomain Name System( DNS ) ရဲ႕ Check Box ကို "on"ေပးပါ။
ျပီးရင္ OK ကိုပဲႏွိပ္ပါ။ ဒါဆိုရင္
Networking Service မွာ Check Box on ျပီးသြားတာကို ေတြ႕ရပါလိမ့္မယ္
ျပီးရင္ OK ကိုပဲႏွိပ္ပါ။ ဒါဆိုရင္
Networking Service မွာ Check Box on ျပီးသြားတာကို ေတြ႕ရပါလိမ့္မယ္။
Next ကို ႏွိပ္ပါ။
Configuration Components Page ေပၚမယ္။ Windows Component File ေတြကို Copy ကူးယူပါလိမ့္မယ္။Windows Server 2003 CD Disk ေတာင္းမယ္။ ထည့္ေပးပါ။
Windows Components ကို Install လုပ္ျပီးသြားျပီျဖစ္လုိ႔ Finish Button ကို ႏွိပ္ပါ။

အခု Windows Components ထဲက Domain
Name System ဆိုတဲ့ DNS Components ကို Installလုပ္ျပီးသြားျပီျဖစ္လို႔ DNS Console
ထဲကို ၀င္ပါ။ Start> Administrative Tools > DNS ကို ႏွိပ္ပါ။ ဒါဆိုရင္DNS
Console ဖြင့္လာပါလိမ့္မယ္။
DNS Consoleထဲမွ Forward Lookup Zone ႏွင့္ Reverse Lookup Zone ဆိုတဲ့ Zone (၂)ခုကိုေတြ႕ရမွာျဖစ္ပါတယ္။ ၄င္း Forward Lookup Zone ႏွင့္ Reverse Lookup Zone ႏွစ္ခုတြင္ New Zone ေတြတည္ေဆာက္ေပးရမွာ ျဖစ္ပါတယ္။ ဒါေၾကာင့္ Forward Lookup Zone ထဲတြင္ New Zone စေဆာက္ေပးမွာျဖစ္လုိ႔ Forward Lookup Zone ေပၚတြင္ Right Click>New Zone ကိုေရြးပါ။
Welcome to the New Zone Wizard ေပၚေပါက္လာပါမယ္။ Nextကို ႏွိပ္ပါ။
Zone Type Page ေပၚလာပါမယ္။
Primary Zone ကိုေရြးျပီးရင္ Nextကိုု ႏွိပ္ပါ။

Dynamic Update Page ေပၚမယ္။ Allow Both nonsecure and secure Dynamic Updates ကို ေရြးပါ။ျပီးရင္ Next ကို ႏွိပ္ပါ။

Completing the New Zone
Wizard ေပၚပါမယ္။ Finishကို ႏွိပ္ပါ။
ကဲဒါဆိုရင္ေတာ့ Forward Lookup Zone ကို တည္ေဆာက္ျပီးျပီျဖစ္လုိ႔ youth.com ဆိုတဲ့ Zone Nameကိုေတြ႕ရပါမယ္။

ဆက္လက္ျပီးေတာ့ Reverse Lookup Zoneကို တည္ေဆာက္ျပမွာျဖစ္ပါတယ္။ ဒါေၾကာင့္ Reverse Lookup Zoneေပၚမွာ Right Click ႏွိပ္ New Zone ကို ေရြးပါ။
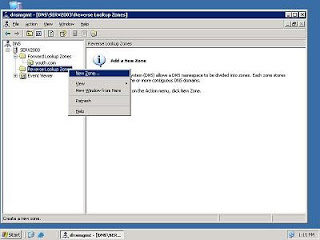
Welcome to the New Lookup Zone Wizard Page ေပၚလာလိမ့္မယ္။ Next ကို ႏွိပ္ပါ။
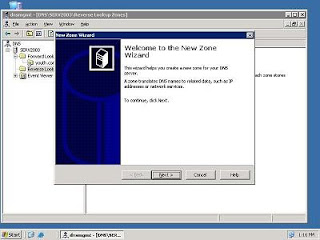
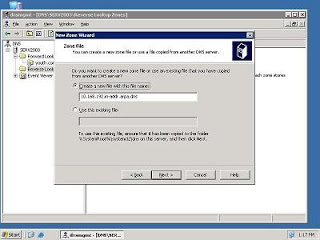
Reverse Lookup Zone Name Page ေပၚလာပါမယ္။ Network ID တြင္ DNS Server Computer ရဲ႕ IP Address 3 Octet ကို ထည့္ေပးရမွာ ျဖစ္ပါတယ္။
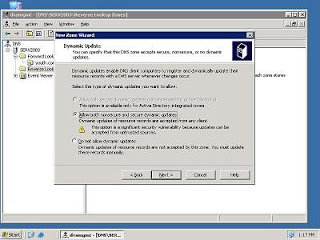
Dynamic Update Page ေပၚမယ္။ Allow both nonsecure and secure dynamic updates ကို ေရြးပါ။ျပီးရင္ Next ကို ႏွိပ္ပါ။
Completing the New Zone
Wizard ေပၚမယ္။ Finish ကို ႏွိပ္ပါ။
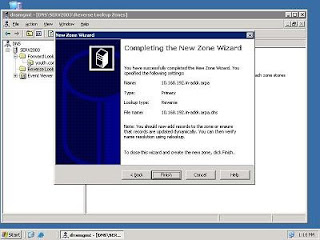
ကဲအခု Reverse Lookup
Zoneကို တည္ေဆာက္ျပီးျပီျဖစ္လုိ႔ Reverse Lookup Zoneကို ေတြ႕ရပါမယ္။
Forward Lookup Zone ႏွင့္ Reverse Lookup Zone ကို တည္ေဆာက္ျပီးသြားျပီျဖစ္လုိ႔ IP Address ႏွင့္ DNS Name ကို Mapping လုပ္ေပး ရန္အတြက္ Record File ေတြကို တည္ေဆာက္ေပးရမွာျဖစ္ပါတယ္။ Forward Lookup Zone တြင္ Host A Record File ကို တည္ေဆာက္ေပးပါမယ္။ Reverse Lookup Zone တြင္ Pointer (PTR) Record File ကို တည္ေဆာက္ေပးရပါမယ္။ ဒါေၾကာင့္ Host A Record File ကို တည္ေဆာက္ရန္အတြက္ youth.com ဆိုတဲ့ Forward Lookup Zone Name ေပၚမွာ Right Click> New Host(A) ကို ႏွိပ္ပါ။
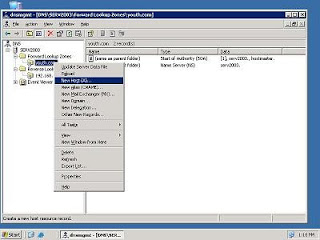
ဒါဆုိရင္ New Host Box ေပၚလာပါမယ္။ Name ေနရာမွာ မိမိ Computer Nameကို ထည့္ပါ။ IP Address တြင္မိမိ IP Address ကို ထည့္ပါ။ ျပီးရင္ Add Host Button ကို ႏွိပ္ပါ။
Add Host Button ကို
ႏွိပ္လိုက္ျပီဆိုရင္ DNS Box ေပၚမယ္။ Host Recordကို ဖန္တီးျပီးျပီဆုိျပီး
ေဖာ္ျပပါမယ္။
Add Host Button ကို ႏွိပ္လိုက္ျပီဆိုရင္ DNS Box ေပၚမယ္။ Host Recordကို ဖန္တီးျပီးျပီဆုိျပီး ပပါမယ္။
Add Host Button ကို ႏွိပ္လိုက္ျပီဆိုရင္ DNS Box ေပၚမယ္။ Host Recordကို ဖန္တီးျပီးျပီဆုိျပီး ပပါမယ္။
ဒါဆိုရင္ပံုမွာေဖာ္ျပထားတဲ့အတုိင္း
Host A Record File ေလးကို ေတြ႕ရမွာ ျဖစ္ပါတယ္။ ၄င္း Host A Record File
ေလးသည္ Name နဲ႕ IP Address ကို Mapping လုပ္ထားေပးတာျဖစ္ပါတယ္။
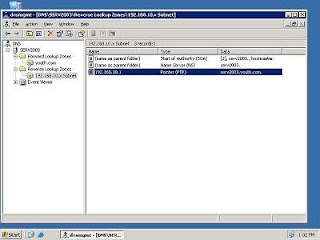
Reverse Lookup Zone တြင္ Pointer (PTR) Record File ကို တည္ေဆာက္ေပးပါမယ္။ ဒါေၾကာင့္192.168.10.X Subnet ဆုိတဲ့ Reverse Lookup Zone ကို Right Click ႏွိပ္ျပီး New Pointer (PTR)ကို ေရြးပါ။
New Resource Record Box ေပၚမယ္။ အဲဒီ box ထဲက Host IP Number ထဲမွာ DNS IP Address ကိုထည့္ပါ။ ျပီးရင္ Host Name မွာ Forward Lookup Zone ထဲက Host A File ထဲက FQDN Nameကိုထည့္ေပးရပါမယ္။ ျပီးရင္ OK ကိုႏွိပ္ပါ။
ဒါဆုိရင္ ေအာက္မွာျပထားတဲ့အတိုင္း Pointer (PTR) Record File ကို ေတြ႕ရမွာျဖစ္ပါတယ္။
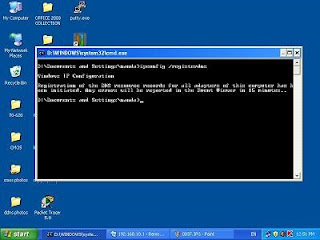
ကဲအခုဆုိရင္ ကၽြန္ေတာ္တို႔ေတြသည္ DNS Serverၾကီးကို ထုိင္ျပီးသြားျပီ။ Dynamic Update ေတြလည္းဖြင့္ထားတယ္။ ဒါေၾကာင့္ Client Computer ေတြကေန DNS Server ၾကီးဆီမွာ Host(A) ႏွင့္ Pointer PTRResource Record File ေတြကို ဘယ္လုိမ်ိဳး Dynamic Update လုပ္ရ တယ္ဆိုတာကို ဆက္လက္ျပီးလုပ္ၾကရေအာင္။ Client Computer တစ္လံုးက DNS Server ၾကီးဆီကေန Host(A) ႏွင့္ Pointer PTR Resource Record File ကို Dynamic Update လုပ္ရန္ အသံုးျပဳရမယ့္ Command ကေတာ့ ipconfig /registerdns ဆုိတဲ့ Command နဲ႕ Dynamic Update လုပ္ရမွာ ျဖစ္ပါတယ္။ အဲဒီလိုု Dynamic DNS serverၾကီးဆီကေန Dynamic Update လုပ္ႏိုင္ရန္အတြက္ မိမိ Client Computer ရဲ႕ Full Computer Name တြင္DNS Name အျပည့္အ၀ရွိေနမွာျဖစ္တယ္။ ဒါေၾကာင့္ မိမိ Computer ရဲ႕ DNS Name အျပည့္အ၀ရွိဖို႔ရန္အတြက္
My Computer ကို Right
Click >Properties ထဲ၀င္ပါ။ ျပီးရင္ Computer Name Tab ကို သြားပါ။ အဲဒီComputer
Name Tab ထဲက Change Button ကို ႏွိပ္ပါ။ ျပီးရင္ More Button ကို ထပ္ႏွိပ္ပါ။
အဲဒီမွာPrimary DNS Suffix of this Computer ဆိုတဲ့ Computer Name အတြက္ DNS
အပိုင္းအစထည့္ဖုိ႔ရန္ေနရာကို
ေတြ႕ရမယ္။ အဲဒီမွာ youth.com လုိ႔ ရိုက္ထည့္ေပးပါ။ ျပီးရင္ OK ႏွိပ္ပါ။ OK ပဲဆက္ႏွိပ္ပါ။
မိမိရဲ႕ Computer Restart ခ်ရပါမယ္။ Restart ခ်ေပးပါ။ Restart ခ်ျပီးလုိ႔ မိမိရဲ႕
Computer Windows တက္ျပီးသြားျပီဆိုရင္ေတာ့ Command Prompt ထဲကေန ipconfig /
registerdns ဆိုျပီးရိုက္လုိ္က္ပါ။ ဒါဆိုရင္ မိမိရဲ႕ DNS Server မွ Client
Computer ရဲ႕Host A ႏွင့္ Pointer PTR ResourceRecord File ကို Dynamic Update
လုပ္ျပီးသားျဖစ္သြားပါလိမ့္မယ္။
ကဲအခု ကၽြန္ေတာ္ရဲ႕
Step by Step DNS Installation လုပ္ပံုလုပ္နည္းအဆင့္ဆင့္ကေတာ့ ျပီးဆံုးသြားပါျပီ။


No comments:
Post a Comment